Check out The Big Spoon's new home at http://thebigspoonblog.com/!
June 27, 2012


June 26, 2012
Piped Roses
This past weekend, I celebrated a dear friends birthday in Muskoka with a group of fabulous gals. I used it as a perfect excuse to bake a birthday cake and an even more perfect excuse to practice piped roses. I baked a red velvet cake using Magnolia Bakery's recipe, with a few of my own tweaks and paired it with a Barefoot Contessa cream cheese frosting and ended up with a major hit and even a few oos and aahs.
I woke up and baked the cakes early in the morning so they would cool off in order to decorate. I made two recipes of the cream cheese frosting because I read the piped roses would use a lot of frosting….did they ever. I ended up making 3 and a half recipes and only just had enough!
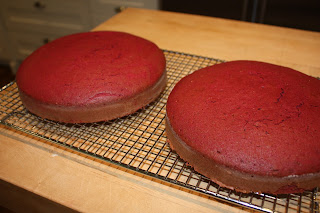
I baked two layers instead of three and made cupcakes with the remaining batter. First things first, you need to level the cakes out in order to stack them together.

It's a bit heartbreaking cutting off and discarding all your hard work but at least you get to taste test it! Level off the tops of the two cakes using a serrated knife. Tip: keep the knife at a 90 degree angle to have an even cake top. Ice one side with a thick later of the frosting then stack the cakes together, flipping one over so the top layer is even.

The next step is very important - the crumb coat!

Cover the entire cake with a thin layer of the frosting. This will be the "background" for the roses
I had to work quickly because the frosting was melting with the humidity! I'm sure you will be neater than I was!

I started off practicing the piped roses on a cupcake. This one wasn't so great but I finally got the hang of it. I followed a blog to learn how to go about making the flowers but it really is simple: Take any medium to large star piping tip and make simply wrap the frosting two times around a centre point. I suggest practising first - even on your counter top! You can always scoop it up and put it back in the piping bag.


Begin by wrapping the entire sides of the cake with roses - don't worry about the spaces - you will fill them later!
 Next: move to the top! I suggest working quickly - cream cheese frosting melts quickly as your hands warm up the piping bag. I even turned off the lights to minimize the melting.
To fill in the spaces, follow the direction of the rose next to the space and make an extra "petal" around the rose. At first, it will look a big strange (you can see a not so good example here) but once the entire cake is filled you will be more than pleased.
This was my first (embarrassing) attempt - I scraped off the entire cake and started again and ended up with much more beautiful results.

I know this method seems daunting and difficult but it was simple and successful! Try out one rose on your next frosted baked good - you'll be glad you did! www.wilton.com has some great tips on decorating cakes. Check this out to learn more about properly holding a piping bag.
I woke up and baked the cakes early in the morning so they would cool off in order to decorate. I made two recipes of the cream cheese frosting because I read the piped roses would use a lot of frosting….did they ever. I ended up making 3 and a half recipes and only just had enough!

I baked two layers instead of three and made cupcakes with the remaining batter. First things first, you need to level the cakes out in order to stack them together.

It's a bit heartbreaking cutting off and discarding all your hard work but at least you get to taste test it! Level off the tops of the two cakes using a serrated knife. Tip: keep the knife at a 90 degree angle to have an even cake top. Ice one side with a thick later of the frosting then stack the cakes together, flipping one over so the top layer is even.

The next step is very important - the crumb coat!

Cover the entire cake with a thin layer of the frosting. This will be the "background" for the roses
I had to work quickly because the frosting was melting with the humidity! I'm sure you will be neater than I was!

I started off practicing the piped roses on a cupcake. This one wasn't so great but I finally got the hang of it. I followed a blog to learn how to go about making the flowers but it really is simple: Take any medium to large star piping tip and make simply wrap the frosting two times around a centre point. I suggest practising first - even on your counter top! You can always scoop it up and put it back in the piping bag.

A rose!

Begin by wrapping the entire sides of the cake with roses - don't worry about the spaces - you will fill them later!
 Next: move to the top! I suggest working quickly - cream cheese frosting melts quickly as your hands warm up the piping bag. I even turned off the lights to minimize the melting.
To fill in the spaces, follow the direction of the rose next to the space and make an extra "petal" around the rose. At first, it will look a big strange (you can see a not so good example here) but once the entire cake is filled you will be more than pleased.
 |

I know this method seems daunting and difficult but it was simple and successful! Try out one rose on your next frosted baked good - you'll be glad you did! www.wilton.com has some great tips on decorating cakes. Check this out to learn more about properly holding a piping bag.
June 25, 2012
Red Velvet Cake with Cream Cheese Frosting

Magnolia Bakery Red Velvet Cake (with a few tweaks!)
Preheat oven to 350°F. Grease and lightly flour three 9- by 2-inch round cake pans, then line the bottoms with waxed paper.
To make the cake: In a small bowl, sift the cake flour and set aside. In a large bowl, on the medium speed of an electric mixer, cream the butter and sugar until very light and fluffy, about 5 minutes. Add the eggs, one at a time, beating well after each addition. In a small bowl, whisk together the red food coloring, cocoa, and vanilla. Add to the batter and beat well.
In a measuring cup, stir the salt into the buttermilk. Add to the batter in three parts alternating with the flour. With each addition, beat until the ingredients are incorporated, but do not overbeat. In a small bowl, stir together the cider vinegar and baking soda. Add to the batter and mix well. Using a rubber spatula, scrape down the batter in the bowl, making sure the ingredients are well blended and the batter is smooth.
Divide the batter among the prepared pans. Bake for 30-40 minutes, or until a cake tester inserted in the center of the cake comes out clean. Let the layers cool in the pans for 1 hour. Remove from the pans and cool completely on a wire rack. Let cool completely before icing.
Cream Cheese Frosting, Courtesy of Barefoot Contessa (x3 for piped roses)
- 8 ounces cream cheese, at room temperature
- 12 tablespoons (1 1/2 sticks) unsalted butter, at room temperature
- 1/2 teaspoon pure vanilla extract
- 3 1/2 cups sifted confectioners' sugar (3/4 pound)
Place the cream cheese, butter, and vanilla in the bowl of an electric mixer fitted with the paddle attachment, and mix on medium speed just until combined. Don't whip! Add the sugar and mix until smooth.
June 19, 2012
Arriba!
Lately, I have been gravitating towards Mexican food. I don't know if its the sudden slew of amazing Mexican restaurants in Toronto (Playa Cabana, Grand Electric, La Carnita), or my love for margaritas and overly flavourful food, but I just can't get enough of it. Bringing a taste of Mexico to your own home can be simple, healthy, and delicious. Here are a couple of easy recipes for salsa and guacamole. I have adapted them (slightly) from Grand Electric's famed recipes featured in the Toronto Star. Check them out here.
Guacamole
4 avocados
1-2 small jalapeños, seeded and very finely diced (less if you don't like the heat)
1/4 medium spanish onion, finely diced
 |
juice of 3-4 small limes
salt
Combine ingredients together in a bowl and mush the avocado until it is smooth, but still chunky and most definitely not in the form of a puree. Season to taste with salt and lime juice.
Pico de Gallo
3 ripe tomatoes, finely diced
1/2 spanish onion, finely diced
1-2 jalapeños, finely diced
juice of 2 limes
handful of cilantro, finely diced (this can be omitted if you - like some- hate cilantro)
splash of olive oil
salt
Mix ingredients together and season to taste. Pico de gallo can even be used as a salad dressing on a taco salad.
June 14, 2012
Aperol Spritz
 When I first moved to New York, I was introduced to a fun new cocktail - an aperol spritz. Aperol is an Italian aperitif with a bit of a citrus flavour. A few months passed, and there it was again - at the top of a cocktail menu in one of New York's most popular speakeasy bars. The very next day, I was at a restaurant and heard a man next to me order a…I'm sure you can guess... aperol spritz! I came back to Toronto and decided to recreate the refreshing delicious drink for my family (even the LCBO made a big deal about the aperol)! Then, crazily enough, I went to a Charlie's Burgers dinner (see the droll worthy pictures below) and the aperitif was an aperol spritz.
If, unlike me, you haven't had or haven't heard about this drink, please order it or even better - recreate it yourself!
The recipe is on the back of the bottle:
Aperol Spritz
Ice
Slice of Orange
3 parts Procescco
2 parts Aperol
Splash of soda water

June 13, 2012
Tip for Tat
Everyone always asks me what the best thing I learned in culinary school was. I don't think it was how to make hollandaise, or a jus, or how to perfectly bone a fish. I do, however, think it was the small little tips and pointers that I have turned into habits in my every day cooking.
The first one is mis en place. Mis en what? This frilly French term is actually very simple - putting into place. The idea is that before any simmering, boiling, or grilling, you organize and measure out your ingredients. Who wants to worry about measuring 1/2 teaspoon of salt when you have three sizzling pans on the go? Prepping your ingredients will make new cooks calmer and seasoned cooks even better.
These are a few tools I like to use, but anything goes - as long as its dishwasher safe!
These graduated stainless steel bowls are also great for baking. Get a bunch of them - you'll be surprised how many you need!
Stay tuned for more tips!
The first one is mis en place. Mis en what? This frilly French term is actually very simple - putting into place. The idea is that before any simmering, boiling, or grilling, you organize and measure out your ingredients. Who wants to worry about measuring 1/2 teaspoon of salt when you have three sizzling pans on the go? Prepping your ingredients will make new cooks calmer and seasoned cooks even better.
These are a few tools I like to use, but anything goes - as long as its dishwasher safe!
These graduated stainless steel bowls are also great for baking. Get a bunch of them - you'll be surprised how many you need!
 |
| Stainless-Steel Restaurant Mixing Bowls, Set of 5, $75.94 |
 |
| Glass Prep Bowls, Williams Sonoma, $37.93 |
June 12, 2012
Charlie's Burgers: The Anti Restaurant
I wouldn't even dream of liking anything "anti-restaurant" until I met Charlie. Charlie Burger isn't a Charlie, or a Burger, but a somewhat secret dinner society. Foodies from around Toronto can sign up, fill out a questionnaire, and be invited (and hopefully picked) to attend a chef designed dinner at a secret locale in Toronto. I was lucky enough to attend one last summer, and again this past weekend. Once chosen, Charlie sends vague but mysterious emails to the attendees notifying them where to meet, who to look for (generally a guy sitting on a wine barrel), and what secret "pass code" (Ours was...I like my pasta cooked with west coast water). The meal was created by Chef Lee Cooper, of L'Abbatoir in Vancouver and was simply incredible. My foodie friend and I were overwhelmed with the foods originality, creativity, and the incredible experience overall. Each dish had layer upon layer of flavour, and highlighted seasonal fresh produce and ingredients. Charlie's Burgers is not for the faint hearted - pigeon and lambs brains have been known to grace the menu - but- if you love food, and are open to try anything, I highly suggest testing your luck and signing up at http://www.charliesburgers.ca/.
Learn more about Charlie's Burgers here:
http://www.theglobeandmail.com/life/food-and-wine/food-trends/revealed-charlie-burgers-true-identity/article588310/?page=all
Here are a few pictures and the menu.


Learn more about Charlie's Burgers here:
http://www.theglobeandmail.com/life/food-and-wine/food-trends/revealed-charlie-burgers-true-identity/article588310/?page=all
Here are a few pictures and the menu.


Jewels (Pearls) of the Sea

It's just my luck that a few years ago, Pearl's published a cook book! Although never quite the same (I think some secret ingredients are left out of this recipe), this version is pretty darn delicious. Make the shoestring fries that come with the roll….I highly suggest it!
Pearl Oyster Bar Lobster Roll
(Serves two)
Ingredients:
2 pounds cooked lobster meat, chopped roughly into 1/2 and 3/4-inch pieces
1/2 celery rib, finely chopped
1/4 cup Hellman's mayonnaise
Squeeze of lemon
Pinch of kosher salt and freshy ground black pepper
2 teaspoons unsalted butter
2 Pepperidge Farm top-loading hot dog buns
Chopped chives for garnish
Directions:
To make the lobster salad, in a large bowl, combine the lobster meat, celery, mayonaiise, lemon and salt and pepper and mix thoroughly. Cover the mixture and store it in the refrigerator until ready to serve. It will last for up to two days.
To prepare the bun, in a small sauté pan over low to medium heat, melt the butter. Place the hot dog buns on their sides in the butter. Flip the buns a couple of times so that both sides soak up an equal amount of butter and brown evenly. Remove the buns from the pan and place them on a large plate.
Fill the toasted buns with lobster salad. Sprinkle with chives and serve with a salad, slaw or shoestring fries.

Japa…dog?

Japadog is located at Burrard and Smithe, 530 Robson, Burrard and Pender St, Granville and Cordova, in Vancouver. They also have a location at 30 St. Marks Place, in New York.
May 12, 2012
Don't Scream Bloody Mary!

While living in New York I have to settle for simple bloody marys. Cookshop (at 10th and 20th, in the Meatpacking District) makes a GREAT one. They add olives to theirs which makes me love it even more.
I have attached recipes for both bloody marys and caesars - whichever you choose do NOT forget the seasoned salt and go heavy on the spiciness!
Martha Stewart's Bloody Mary
- 4 cups tomato juice
- Juice of 2 large lemons
- 1 to 2 tablespoons Worcestershire sauce
- 1 heaping tablespoon prepared horseradish
- 1 1/2 cloves garlic, passed through a garlic press
- 2 teaspoons coarsely ground pepper
- 1/4 to 1/2 teaspoon Tabasco sauce
- Unflavored vodka, to taste
- Lemon wedges, for serving
- Celery sticks, for serving and munching
Classically Canadian Caesar
- 1 1/2 oz vodka
- 4 oz clamato juice
- 2 dashes Worchestershire Sauce
- desk of tabasco Sauce
- celery salt (to line the rim)
- pepper to taste
- Lemon wedges, for serving
- Celery sticks, for serving and munching
For both drinks, line the rims of a highball class with celery salt, combine ingredients with lots of ice, and most importantly, enjoy!
December 31, 2011
Did Somebody Cut the Cheese?!
Living in New York as an art business student is perfect - there are museums, galleries, and auction houses galore! Living in New York as a FOODIE could arguably be even better....not too far from my apartment is Mario Batali's new jont Eataly. This is a massive grocery store devoted entirely to italian food. There are a few restaurants categorized by the food they serve...there is a vegetarian restaurant, a fish, pizza, pasta, you get it! One of my go to stations makes fresh mozzarella. This gooey beautiful cheese is made right in front of customers! One day I would love to make my own cheese...but until then Eataly will do!
 |
| The mozzarella chef makes the cheese then grates it with an old fashioned Italian grater into small slices. |
Next time you are there, ask him for a sample. Your taste buds will thank you!
 |
| He then melts it in a temperature controlled bath of warm water and kneads it into balls of cheese! |
December 28, 2011
Finding Faith at the Burger's Priest
Many of you may have already trekked down Queen Street to find religion. Now, you may be asking - what the heck is she talking about! I am referring to the mouth watering, taste bud tingling, and food coma inducing Burger's Priest. This tiny burger joint is whipping out the most delicious burger I have ever laid my lips on. If you haven't yet, pay this place a visit. You just may become religious!
Be sure to ask for something off the secret menu...a few items not listed on the menu that aim to please. Check a few of them out after the mouth watering pictures!


Here a few "secret menu" items...shh!
(You must know that "the option" is a fried-cheese-stuffed-portabello mushroom...see above for the oozy delicious vegetarian option!)
The High Priest: A big mac type burger
The Vatican City: Grilled cheese sandwiches act as the bun with a double double in-between
Tower of Babel: The Vatican City with an Option in the middle
Judgment Day: Two Options with a cheeseburger patty in-between.
The Holy Smokes: panko breaded jalapeño peppers - my personal favourite!
The secret menu goes on and on...pop in and check it out for yourself!
The Burger's Priest
1636 Queen Street East
3397 Yonge Street
Closed Sundays for Church!
White Bean Dip
I LOVE dips. What's not to love! Plunging your favourite dip-holding-vessels into delicious flavourful bowls of goodness with a bunch of your friends could possibly be one of the best things ever. This white bean dip is easy and requires no measuring - just tasting!
Add the juice of one lemon, a bunch of parsley, two garlic cloves (or less if you don't feel like frightening your friends with your garlic breath), a quarter cup of good quality olive oil, and a can of rinsed and drained white beans to a food processor. I imagine this would taste delicious with chick peas as well!
Blitz those beans until you have found your desired consistency - don't forget to taste it! Season with salt and pepper.

Add the juice of one lemon, a bunch of parsley, two garlic cloves (or less if you don't feel like frightening your friends with your garlic breath), a quarter cup of good quality olive oil, and a can of rinsed and drained white beans to a food processor. I imagine this would taste delicious with chick peas as well!


Blitz those beans until you have found your desired consistency - don't forget to taste it! Season with salt and pepper.
 |
| Serve with your favourite crackers and dig in! |
So That's How You Tune A Fish!
Those who know me are well aware of my obsession with seafood. Salty, briny, slimy, you name it and I love it! I am drawn to the little critters on any menu and would cook seafood every day for the rest of my life. I also love RAW seafood. There really is nothing better! Tartares are one of my go to's and they really are so simple to make! The key is buying "sushi" quality fish - ask your fish monger when the fish came in and ask to take a wiff of the beautiful sea creature - it should smell like fish but not fishy - there truly is a difference! It also should be bright in colour, firm to the touch, and never frozen!
This tartar recipe is adapted from Martha Stewart's (my gal) book on appetizers. She serves little piles of this tartar on cucumber or radish rounds but big spoonfuls of the delicious tartare works for me. Chop the tuna very finely so you have an even consistency but don't make it too mushy! Tiny cubes work best.
Tip: if you put the fish in the freezer for about 30-45 minutes prior to chopping, it firms up and is much easier to chop! Just be sure you don't freeze it solid!

Tuna Tartare:
1 lb SUSHI QUALITY raw tuna
2 tbs light soy sauce
1 tbs rice wine vinegar
1 tbs sesame oil
1 bunch of chives finely diced (green onions work too but keep them fine!)
Pepper to taste
Optional: a few sprigs of fresh cilantro

If you wish you can add a dollop of spicy mayo to the mix or even stir it right in! Just add the mayo slowly in order to not over spice or over mayo your tartare - you want to still taste the flavors of the sea!
Spicy Mayo:
1/2 cup kewpie (this is a Japanese mayo found in a squishy bottle with a baby on it...dont ask just enjoy!)
Sriacha Hot Sauce to taste (this is the Foodie God's gift to spice lovers. be careful - its strong!)
Mix together and enjoy!
This tartar recipe is adapted from Martha Stewart's (my gal) book on appetizers. She serves little piles of this tartar on cucumber or radish rounds but big spoonfuls of the delicious tartare works for me. Chop the tuna very finely so you have an even consistency but don't make it too mushy! Tiny cubes work best.
Tip: if you put the fish in the freezer for about 30-45 minutes prior to chopping, it firms up and is much easier to chop! Just be sure you don't freeze it solid!

Tuna Tartare:
1 lb SUSHI QUALITY raw tuna
2 tbs light soy sauce
1 tbs rice wine vinegar
1 tbs sesame oil
1 bunch of chives finely diced (green onions work too but keep them fine!)
Pepper to taste
Optional: a few sprigs of fresh cilantro
Chop the tuna finely then combine all the ingredients in a bowl and let sit, refrigerated, for about an hour.

Eat and enjoy!
If you wish you can add a dollop of spicy mayo to the mix or even stir it right in! Just add the mayo slowly in order to not over spice or over mayo your tartare - you want to still taste the flavors of the sea!
Spicy Mayo:
1/2 cup kewpie (this is a Japanese mayo found in a squishy bottle with a baby on it...dont ask just enjoy!)
Sriacha Hot Sauce to taste (this is the Foodie God's gift to spice lovers. be careful - its strong!)
Mix together and enjoy!
December 27, 2011
Fruit Ninja
As you may have guessed, I am feeling a bit nostalgic for my summer travels. Sometimes drab Toronto/New York makes me long for summer sun - and especially summer produce! In Bodrum, Turkey, a small coastal city in Turkey, there is the most spectacular fruit market perhaps in the entire world! (I'll let you know if I find anything better!) The fruit looks as though it has been painted and plumped for these stands but it is as organic as organic can be. I could have sat in front of the market for days staring at (and eating) this beautiful fruit. Can you blame me?!


Turkish Delight
This past summer, my friend Jodi and I had the pleasure of travelling through Turkey and Greece for three wonderful and fascinating weeks. One of the highlights was, of course, eating the incredible local delicacies! Travelling is one of my favourite pastimes mostly because of the food! I could eat my way through any place on this earth! In Istanbul there is a famous spice market at the centre of the city. Locals and tourists come together each day to buy different spices native to Turkey and to Turkish Cuisine. The aroma in the Spice Hall is outstanding and one not to be missed! Jodi and I brought home some delicious spices including Turkish saffron, Ottoman spice (a blend of many spices used since the days of the Ottoman Empire), and mixed peppercorns. For any foodie, the Spice Market is heaven!


Subscribe to:
Posts (Atom)