Check out The Big Spoon's new home at http://thebigspoonblog.com/!
June 27, 2012
June 26, 2012
Piped Roses
This past weekend, I celebrated a dear friends birthday in Muskoka with a group of fabulous gals. I used it as a perfect excuse to bake a birthday cake and an even more perfect excuse to practice piped roses. I baked a red velvet cake using Magnolia Bakery's recipe, with a few of my own tweaks and paired it with a Barefoot Contessa cream cheese frosting and ended up with a major hit and even a few oos and aahs.
I woke up and baked the cakes early in the morning so they would cool off in order to decorate. I made two recipes of the cream cheese frosting because I read the piped roses would use a lot of frosting….did they ever. I ended up making 3 and a half recipes and only just had enough!
I baked two layers instead of three and made cupcakes with the remaining batter. First things first, you need to level the cakes out in order to stack them together.

It's a bit heartbreaking cutting off and discarding all your hard work but at least you get to taste test it! Level off the tops of the two cakes using a serrated knife. Tip: keep the knife at a 90 degree angle to have an even cake top. Ice one side with a thick later of the frosting then stack the cakes together, flipping one over so the top layer is even.

The next step is very important - the crumb coat!

Cover the entire cake with a thin layer of the frosting. This will be the "background" for the roses
I had to work quickly because the frosting was melting with the humidity! I'm sure you will be neater than I was!

I started off practicing the piped roses on a cupcake. This one wasn't so great but I finally got the hang of it. I followed a blog to learn how to go about making the flowers but it really is simple: Take any medium to large star piping tip and make simply wrap the frosting two times around a centre point. I suggest practising first - even on your counter top! You can always scoop it up and put it back in the piping bag.


Begin by wrapping the entire sides of the cake with roses - don't worry about the spaces - you will fill them later!
 Next: move to the top! I suggest working quickly - cream cheese frosting melts quickly as your hands warm up the piping bag. I even turned off the lights to minimize the melting.
To fill in the spaces, follow the direction of the rose next to the space and make an extra "petal" around the rose. At first, it will look a big strange (you can see a not so good example here) but once the entire cake is filled you will be more than pleased.
This was my first (embarrassing) attempt - I scraped off the entire cake and started again and ended up with much more beautiful results.

I know this method seems daunting and difficult but it was simple and successful! Try out one rose on your next frosted baked good - you'll be glad you did! www.wilton.com has some great tips on decorating cakes. Check this out to learn more about properly holding a piping bag.
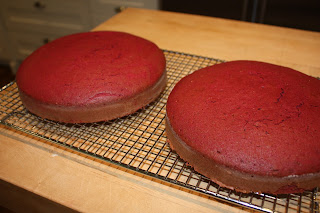
I woke up and baked the cakes early in the morning so they would cool off in order to decorate. I made two recipes of the cream cheese frosting because I read the piped roses would use a lot of frosting….did they ever. I ended up making 3 and a half recipes and only just had enough!

I baked two layers instead of three and made cupcakes with the remaining batter. First things first, you need to level the cakes out in order to stack them together.

It's a bit heartbreaking cutting off and discarding all your hard work but at least you get to taste test it! Level off the tops of the two cakes using a serrated knife. Tip: keep the knife at a 90 degree angle to have an even cake top. Ice one side with a thick later of the frosting then stack the cakes together, flipping one over so the top layer is even.

The next step is very important - the crumb coat!

Cover the entire cake with a thin layer of the frosting. This will be the "background" for the roses
I had to work quickly because the frosting was melting with the humidity! I'm sure you will be neater than I was!

I started off practicing the piped roses on a cupcake. This one wasn't so great but I finally got the hang of it. I followed a blog to learn how to go about making the flowers but it really is simple: Take any medium to large star piping tip and make simply wrap the frosting two times around a centre point. I suggest practising first - even on your counter top! You can always scoop it up and put it back in the piping bag.

A rose!

Begin by wrapping the entire sides of the cake with roses - don't worry about the spaces - you will fill them later!
 Next: move to the top! I suggest working quickly - cream cheese frosting melts quickly as your hands warm up the piping bag. I even turned off the lights to minimize the melting.
To fill in the spaces, follow the direction of the rose next to the space and make an extra "petal" around the rose. At first, it will look a big strange (you can see a not so good example here) but once the entire cake is filled you will be more than pleased.
 |

I know this method seems daunting and difficult but it was simple and successful! Try out one rose on your next frosted baked good - you'll be glad you did! www.wilton.com has some great tips on decorating cakes. Check this out to learn more about properly holding a piping bag.
June 25, 2012
Red Velvet Cake with Cream Cheese Frosting

Magnolia Bakery Red Velvet Cake (with a few tweaks!)
Preheat oven to 350°F. Grease and lightly flour three 9- by 2-inch round cake pans, then line the bottoms with waxed paper.
To make the cake: In a small bowl, sift the cake flour and set aside. In a large bowl, on the medium speed of an electric mixer, cream the butter and sugar until very light and fluffy, about 5 minutes. Add the eggs, one at a time, beating well after each addition. In a small bowl, whisk together the red food coloring, cocoa, and vanilla. Add to the batter and beat well.
In a measuring cup, stir the salt into the buttermilk. Add to the batter in three parts alternating with the flour. With each addition, beat until the ingredients are incorporated, but do not overbeat. In a small bowl, stir together the cider vinegar and baking soda. Add to the batter and mix well. Using a rubber spatula, scrape down the batter in the bowl, making sure the ingredients are well blended and the batter is smooth.
Divide the batter among the prepared pans. Bake for 30-40 minutes, or until a cake tester inserted in the center of the cake comes out clean. Let the layers cool in the pans for 1 hour. Remove from the pans and cool completely on a wire rack. Let cool completely before icing.
Cream Cheese Frosting, Courtesy of Barefoot Contessa (x3 for piped roses)
- 8 ounces cream cheese, at room temperature
- 12 tablespoons (1 1/2 sticks) unsalted butter, at room temperature
- 1/2 teaspoon pure vanilla extract
- 3 1/2 cups sifted confectioners' sugar (3/4 pound)
Place the cream cheese, butter, and vanilla in the bowl of an electric mixer fitted with the paddle attachment, and mix on medium speed just until combined. Don't whip! Add the sugar and mix until smooth.
June 19, 2012
Arriba!
Lately, I have been gravitating towards Mexican food. I don't know if its the sudden slew of amazing Mexican restaurants in Toronto (Playa Cabana, Grand Electric, La Carnita), or my love for margaritas and overly flavourful food, but I just can't get enough of it. Bringing a taste of Mexico to your own home can be simple, healthy, and delicious. Here are a couple of easy recipes for salsa and guacamole. I have adapted them (slightly) from Grand Electric's famed recipes featured in the Toronto Star. Check them out here.
Guacamole
4 avocados
1-2 small jalapeños, seeded and very finely diced (less if you don't like the heat)
1/4 medium spanish onion, finely diced
 |
juice of 3-4 small limes
salt
Combine ingredients together in a bowl and mush the avocado until it is smooth, but still chunky and most definitely not in the form of a puree. Season to taste with salt and lime juice.
Pico de Gallo
3 ripe tomatoes, finely diced
1/2 spanish onion, finely diced
1-2 jalapeños, finely diced
juice of 2 limes
handful of cilantro, finely diced (this can be omitted if you - like some- hate cilantro)
splash of olive oil
salt
Mix ingredients together and season to taste. Pico de gallo can even be used as a salad dressing on a taco salad.
June 14, 2012
Aperol Spritz
 When I first moved to New York, I was introduced to a fun new cocktail - an aperol spritz. Aperol is an Italian aperitif with a bit of a citrus flavour. A few months passed, and there it was again - at the top of a cocktail menu in one of New York's most popular speakeasy bars. The very next day, I was at a restaurant and heard a man next to me order a…I'm sure you can guess... aperol spritz! I came back to Toronto and decided to recreate the refreshing delicious drink for my family (even the LCBO made a big deal about the aperol)! Then, crazily enough, I went to a Charlie's Burgers dinner (see the droll worthy pictures below) and the aperitif was an aperol spritz.
If, unlike me, you haven't had or haven't heard about this drink, please order it or even better - recreate it yourself!
The recipe is on the back of the bottle:
Aperol Spritz
Ice
Slice of Orange
3 parts Procescco
2 parts Aperol
Splash of soda water

Subscribe to:
Comments (Atom)